Theories 1-4
This guide is currently undergoing change. Keep in mind, strategies may change.
Theory basics #
Publications are equivalent to prestiges for \(f(t)\) so don’t be afraid to use them. However, the best publication multipliers vary from theory to theory and will change over time. If you are close to a multiplier you want, turn off autobuyer and let \(\rho\) increase without buying upgrades for a faster short-term increase before the publication (turn on after you publish). This is known and referenced as “cruising”. Total \(τ\), found in the equation or at the top of the screen, is a multiplicative combination of all \(τ\) from each theory.
Don’t be afraid to skip getting all milestones to work on the next or a better theory.
Note: If you see # → [# → # → #] → # in the milestone route of a theory, this is the section that has an active strategy tied to it.
Graduation routing #
Remember to follow our routing advice from Introduction to Graduation.
| 5k | → | 5.2k | → | 5.6k | → | 5.8k | → | 6k |
| 6k | → | 7k | → | 8k | ||||
| 8k | → | 8.4k | → | 8.6k | → | 8.8k | → | 9k |
Theory 1 (20σ / 5k) #
T1 Overview #
In mathematics, a recurrence relation is an equation that relies on an initial term and a previous term to change. We start with the current tick’s term, \(ρ_{n}\), and a constant add-on to obtain the value of the next tick, \(ρ_{n+1}\). This gives us an equation equivalent to \(ρ=at+constant\), with a changing value \(a\) and a constant that is the initial value of 1. Later when we add the \(c_{3}ρ_{n-1}^{0.2}\) term, this is now saying that we are now adding each tick the value of \(ρ\) from the previous tick ago with a constant \(c_{3}\) put to the power of \(0.2\). This is the same with the next term \(c_{4}ρ_{n-2}^{0.3}\), with the value of \(ρ\) two ticks ago and a multiplier \(c_4\) put to the power \(0.3\). When we multiply the \(c_1c_2\) term by the term \(1+ln(ρ)/100\) changing the constant addition to being based on the value of \(ρ\) from the previous tick with the value of \(1+ln(ρ)/100\). The final milestone upgrade raises the exponent of \(c_1\) from \(1.00\) to \(1.05\) to \(1.10\) to \(1.15\).
This theory also has its adjusted tickspeed calculated by \(q_{1}*q_{2}\). This lengthens the normal tick length of \(0.1/sec\) to that value which speeds up the theory.
T1 formula #
Initial
\[ρ_{n+1} = ρ_n + c_1c_2\]
First milestone
\[ρ_{n+1} = ρ_n + c_1c_2 + c_3ρ_{n-1}^{0.2}\]
Second milestone
\[ρ_{n+1} = ρ_n + c_1c_2 + c_3ρ_{n-1}^{0.2} + c_4ρ_{n-2}^{0.3}\]
Third milestone
\[ρ_{n+1} = ρ_n + c_1c_2 \left( 1+\frac{ln(ρ_n)}{100} \right) \\\ + c_3ρ_{n-1}^{0.2} + c_4ρ_{n-2}^{0.3}\]
Fourth to Sixth milestone
\[ρ_{n+1} = ρ_n + c_1^{1.15}c_2 \left( 1+\frac{ln(ρ_n)}{100} \right) \\\ + c_3ρ_{n-1}^{0.2} + c_4ρ_{n-2}^{0.3}\]
T1 strategy #
The publication multiplier has no optimal fit, as it fluctuates a lot, but here is known: 4-6 to start; 3-4 between 1e100 and 1e150; the publication multiplier oscillates between 2.5 and 5 past e150. Once you get your second milestone, you can turn off \(c_1\) and \(c_2\) until e150 active strat.
The active strat follows but only works when you have all milestones past e150. T1 is the only theory where the recent value of \(ρ\) influences the rate of change of \(ρ\) therefore buying a variable as soon as you can afford it will slow your progress. Lategame, buying upgrades immediately will slow you more than the benefit of the upgrade because \(c_3\) & \(c_4\) dominate. If the next level costs \(10ρ\) and you have \(11ρ\), buying that level will reduce \(ρ_{n+1}\) to \(1\). This reduces your \(ρ_{n+1}\) by roughly a factor of \(10\). There are \(3\) terms that influence the rate of change of \(ρ\), and all are affected by the previous state of \(ρ\). The active strategy around this is known as T1Ratio. The values in the chart found here are to be only used when you are past \(e150 τ\) and max milestones. They represent how to purchase each variable based on the state of the theory at the time of purchase.
Note: If you are not doing the active strat, then simply turn off \(c_1\) and \(c_2\) after milestone 2 (e50τ) and autobuy rest until ee6k.
The video below is only good for early tau between ee150 and ee250.
T1 milestone route #
| 0/0/1 | → | 0/0/1/1 | → | 0/1/1/1 |
| 0/1/1/1 | → | 3/1/1/1 |
| Or | ||||||
| 3 | → | 4 | → | 2 | ||
| 2 | → | 1 x3 |
Theory 2 (25σ / 6k) #
T2 Overview #
This second theory is focusing on derivatives. Derivatives in mathematics are the rate of change of the function they are the derivative of. For the case of \(q_1\) and \(q_2\), \(q_2\) is the derivative of \(q_1\). This follows the power rule for derivatives:
\[q=a*t^n ↔ q’=n*a*t^{n-1}\]
In simpler terms, it works similar to how \(x_i\) upgrades work for \(f(t)\) equation with continuous addition of the previous \(term*dt\) to the next \(x_{i+1}\) term, but with continuous addition of \(q_i*dt\) to the term above \(q_{i-1}\). These two values of \(r_1\) and \(q_1\) are multiplied to produce the derivative of \(ρ(t)\), shown by the newton derivative form \(\dot{ρ}\). This would give the equation of \(ρ\) to be \(ρ(t+dt)=ρ+\dot{ρ}*dt\). The other milestones besides more \(q\) and \(r\) derivatives increase the exponent of \(q\) and \(r\) respectively. The reason why \(q\) and \(r\) derivatives are more powerful long-term than the exponents is that they take time to build up and eventually overtake and keep increasing \(q_1\) and \(r_1\) while the exponents have a never-changing boost.
T2 formula #
Initial
\[\dot{q_n}=q_{n+1}*dt\] for n=1
\[\dot{r_k}=r_{k+1}*dt\] for k=1
\[\dot{ρ}=q_1r_1\]
First and Second milestones
\[\dot{q_n}=q_{n+1}*dt\] for n=1, 2, 3
\[\dot{r_k}=r_{k+1}*dt\] for k=1
\[\dot{ρ}=q_1r_1\]
Third and Fourth milestones
\[\dot{q_n}=q_{n+1}*dt\] for n=1, 2, 3
\[\dot{r_k}=r_{k+1}*dt\] for k=1, 2, 3
\[\dot{ρ}=q_1r_1\]
Fifth to Seventh milestones
\[\dot{q_n}=q_{n+1}*dt\] for n=1, 2, 3
\[\dot{r_k}=r_{k+1}*dt\] for k=1, 2, 3
\[\dot{ρ}=q_1^{1.15}r_1\]
Eight to Tenth milestones
\[\dot{q_n}=q_{n+1}*dt\] for n=1, 2, 3
\[\dot{r_k}=r_{k+1}*dt\] for k=1, 2, 3
\[\dot{ρ}=q_1^{1.15}r_1^{1.15}\]
T2 strategy #
The optimal multiplier is pretty high and is not known before \(e30\).
The multipliers for active play we know at the moment are:
- \(e25\)-\(e100\) is \(1k\) to \(10k\);
- \(e100\)-\(e175\) \(10k\)-\(100k\).
Idle
For the idle strategy, you want to prioritize your milestones on x/x/0/0 with \(q_{3}\) and \(q_{4}\) being more important than \(r_{3}\) and \(r_{4}\). If you have more than 5 milestones, you will prioritize \(q\) exponent over the \(r\) exponent. You will want to publish at about a \(1000\) multiplier, but larger multipliers are fine.
Active
The goal of the active strategy is to grow \(q_1\) and \(r_1\) as much as possible while being able to take advantage of the exponent milestones. The active for T2 is on a 50-second cycle: 10 seconds on 0/0/x/x milestones and 40 sec on x/x/0/0 milestones. You will start a publication on 0/0/x/x as the cost of the x/x/0/0 milestone upgrades are too large for you to get right away. When you can afford them, you will start the cycle. This is what you will do for the following number of milestones:
| Milestone Cycles | |||||||||
|---|---|---|---|---|---|---|---|---|---|
| 1-2 | 0/0/1(2)/0 | → | 1(2)/0/0/0 | → | 0/0/1(2)/0 | → | 0/1(2)/0/0 | → | Repeat |
| 10s | 40s | 10s | 40s | 100s | |||||
| 3 | 0/0/3/0 | → | 2/1/0/0 | → | 0/0/3/0 | → | 1/2/0/0 | → | Repeat |
| 10s | 40s | 10s | 40s | 100s | |||||
| 4 | 0/0/3/1 | → | 2/2/0/0 | → | Repeat | ||||
| 10s | 40s | 50s | |||||||
| 5-6 | 0/0/3/x | → | 2/2/x/0 | → | Repeat | ||||
| 10s | 40s | 50s | |||||||
| 7+ | x/y/3/3 | → | 2/2/3/x | → | Repeat | (x → y) | |||
| 10s | 40s | 50s | |||||||
Past \(e175\), the active strat will become exponentially less effective. At \(e250\), you would start to idle T2 overnight only. Until you are \(1e350\)+ \(τ\) for theory 2, this is the best theory to run idle overnight.
When you get to Theory 3 at ee7k, move on to pushing Theory 3 \(τ\) and running T2 overnight. The above is simply as an option if you rather not work on T3 now.
T2 milestone route #
| 2/0/0/0 | → | 2/2/0/0 | → | 2/2/3/0 |
| 2/2/3/0 | → | 2/2/3/3 |
| Or | ||||||
| 1 x2 | → | 2 x2 | → | 3 x3 | ||
| 3 x3 | → | 4 x3 |
Theory 3 (30σ / 7k) #
T3 Overview #
The basis of this theory and understanding how it works is based on matrix multiplication. Below I have put a color-coded image to display how matrix multiplication works.
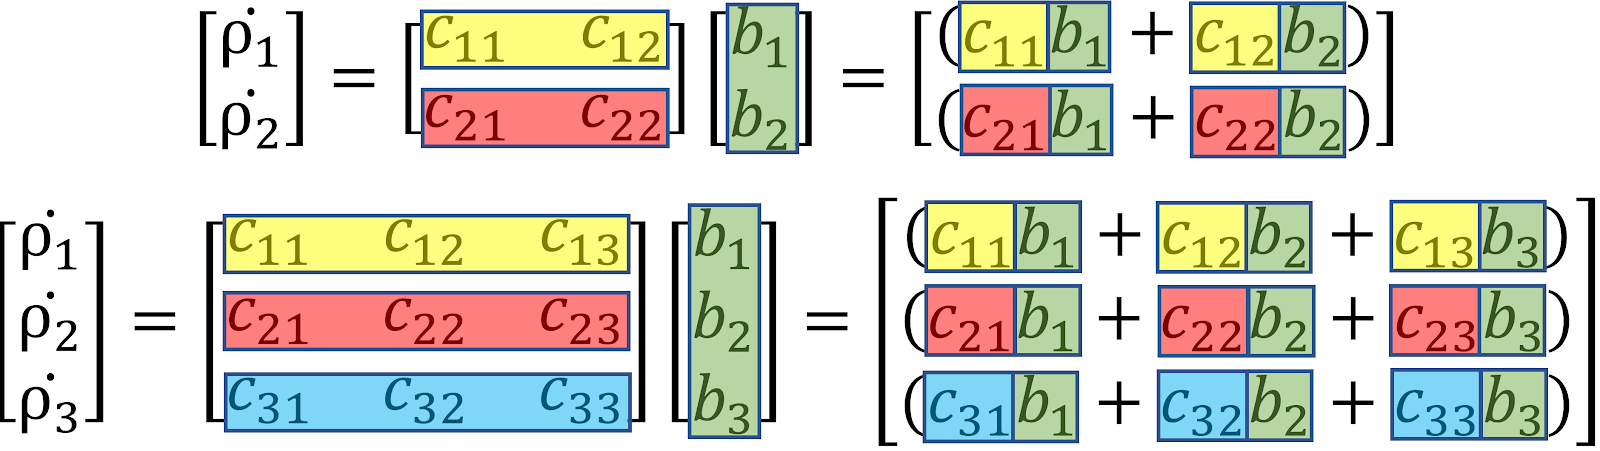
This gives the basis for why certain upgrades are more powerful than others. The exponents on \(b_1\), \(b_2\), and \(b_3\) are all directly affecting \(ρ_1\) production which is used for \(\tau\). An extra dimension roughly gives \(50%\) more \(\tau\) production as it adds an extra term to the \(ρ_1\) production.
T3 strategy #
The optimal publication multiplier is about 2-3 without cruising and 3-4 with cruising. If you decide to play actively, there is a form of exponent swapping strat to be aware of. This is a difficult strategy because it requires you to notice when a certain threshold happens. It happens when the following occurs:
\[c_{11}*b_{1}^{1.05\text{ or }1.1}<c_{12}*b_{2}^{1.05\text{ or }1.1}\]
When this happens swap your exponents from \(b_1\) to \(b_2\) and you will get a little upgrade boost. It also allows for a slight push of \(ρ_2\) for upgrades to \(b_2\) and \(c_{12}\), but this is a lot less impactful and less noticeable. This strategy also works with \(b_3\) and \(c_{13}\) but is oftentimes not as common and good to note anyways.
If you decide to buy manually, the focus areas are \(b_1\), \(b_2\), and \(b_3\) when e1 lower than \(c_{11}\), \(c_{12}\), and \(c_{13}\). These all directly boost the production of \(ρ_1\) which is used for \(\tau\). After this, if doing the active exponent swapping strat in the previous paragraph, the next focus will be on \(c_{21}\), \(c_{22}\), and \(c_{23}\) as these boost \(b_2\) production which is the more likely cause for the exponent swap to occur. This leaves the \(c_{31}\), \(c_{32}\), and \(c_{33}\) upgrades as the last priority. If you are not using the exponent swapping strat in the previous paragraph, then all the remaining upgrades are at equivalent priority.
At the end of any publication, around a 2-3 multiplier, you should turn off \(b_1\) and \(c_31\) as they cost \(ρ_1\). You will cruise until you get to a 3-4 multiplier. Publish and turn back on \(ρ_1\) costing variables and repeat.
Commentary
T3 milestone route #
| Active | ||||
|---|---|---|---|---|
| 0/2/0 | → | 1/0/2/0 | → | 1/2/2/0 |
| 1/2/2/0 | → | 1/2/2/2 |
| Or | ||||||
| 3 x2 | → | 1 | → | 2 x2 | ||
| 2 x2 | → | 4 x2 |
| Idle | ||||
|---|---|---|---|---|
| 0/2/0 | → | 0/2/2 | → | 1/2/2 |
| 1/2/2/0 | → | 1/2/2/2 |
| Or | ||||||
| 3 x2 | → | 2 x2 | → | 1 | ||
| 1 | → | 4 x2 |
Theory 4 (35σ / 8k) #
T4 Overview #
We start out with just one term of constants \(c_1c_2\) and a changing term \(c_3q\) with \(q\) being equal to \(q(t+dt)=q+\dot{q}*dt\) with \(dt=0.1\) for each tick. \(\dot{q}\) is equal to an inverse equation of \(\dot{q}=q_1q_2/(1+q)\) with \(q\) being the current value. The first 3 milestones we grab add more terms to the \(ρ\) equation with \(c_4q_2\), \(c_5q_3\), and \(c_6q_4\). Next, we increase \(\dot{q}\) by a factor of \(2^x\) up to \(2^3\) or \(8\). Finally, we increase the power of \(c_1\) from \(1.00\) to \(1.15\).
T4 formula #
Initial
\[\dot{ρ}=c_1c_2+c_3q\]
\[\dot{q}=q_1q_2/(1+q)\]
First milestone
\[\dot{ρ}=c_1c_2+c_3q+c_4q^2\]
\[\dot{q}=q_1q_2/(1+q)\]
Second milestone
\[\dot{ρ}=c_1c_2+c_3q+c_4q^2+c_5q^3\]
\[\dot{q}=q_1q_2/(1+q)\]
Third milestone
\[\dot{ρ}=c_1c_2+c_3q+c_4q^2+c_5q^3+c_6q^4\]
\[\dot{q}=q_1q_2/(1+q)\]
Fourth to Sixth milestones
\[\dot{ρ}=c_1c_2+c_3q+c_4q^2+c_5q^3+c_6q^4\]
\[\dot{q}=2^3q_1q_2/(1+q)\]
Seventh milestone
\[\dot{ρ}=c_1^{1.15}c_2+c_3q+c_4q^2+c_5q^3+c_6q^4\]
\[\dot{q}=2^3q_1q_2/(1+q)\]
T4 strategy #
The optimal publication multiplier is 4-6. During publications, start with x/1/3, then you will switch to 3/0/x. This will be repeated back and forth throughout the publication. If you decide to manually buy and don’t have max milestones, focus on \(q_1\) and \(q_2\). The next priority is going from the highest \(c_x\) upgrade down to \(c_1\). Each lower priority should be bought \(e1\) cheaper than the priority tier above. If you decide to manually buy at max milestones, at the beginning of publications, buy \(c_1\), \(c_2\), \(c_3\), \(q_1\), and \(q_2\). Once you are within \(e1\)-\(e2\) of your publication mark, swap to only buying \(c_3\), \(q_1\), and \(q_2\).
T4 milestone route #
| 3/0/0 | → | 3/0/3 | → | 3/1/3 |
| Or | ||||||
| 1 x3 | → | 3 x3 | → | 2 |
Theory tier list (Pre-9k+) #
Before you reach 9k, these are the recommended values for each theory. You may not hit the values and have a different distribution, but work on getting these theories up to these values later. This list is in order of priority.
| Multiplier | |
|---|---|
| T2 | e300-e350 τ |
| T1 | e205-e215 τ |
| T3 | e150 τ |
| T4 | e150 τ |